Uncategorized

Glowing Fairy Star

Hi everyone!

Zoe over at Make It Crafty have brought back the colouring challenge! For me that is super exciting, as that was how I got introduced to Make It Crafty and alcohol markers. My first markers was spectrum noirs but through the years I now have collected a full set of copics. Through Zoes challenges I have grown as a colourist and since I’ve been a DT member for Make It Crafty she has continued to challenge me to evolve as an artist.

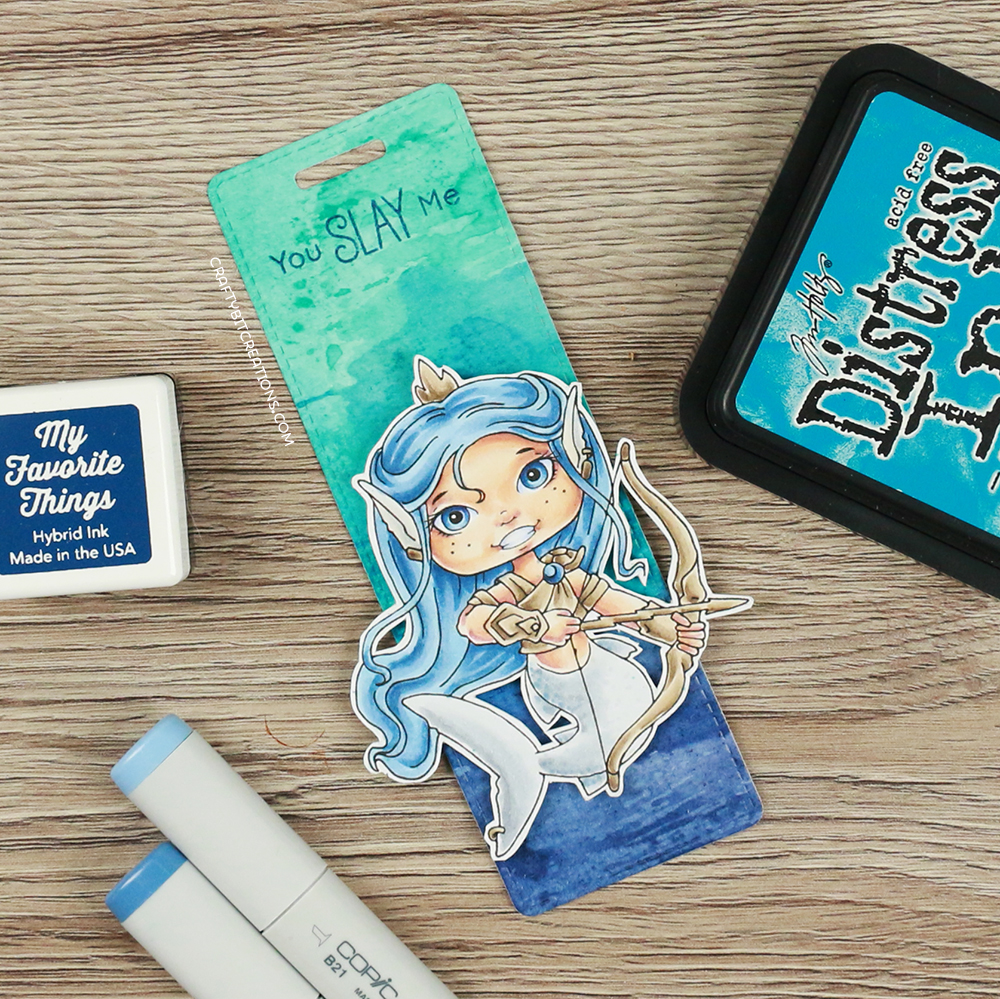
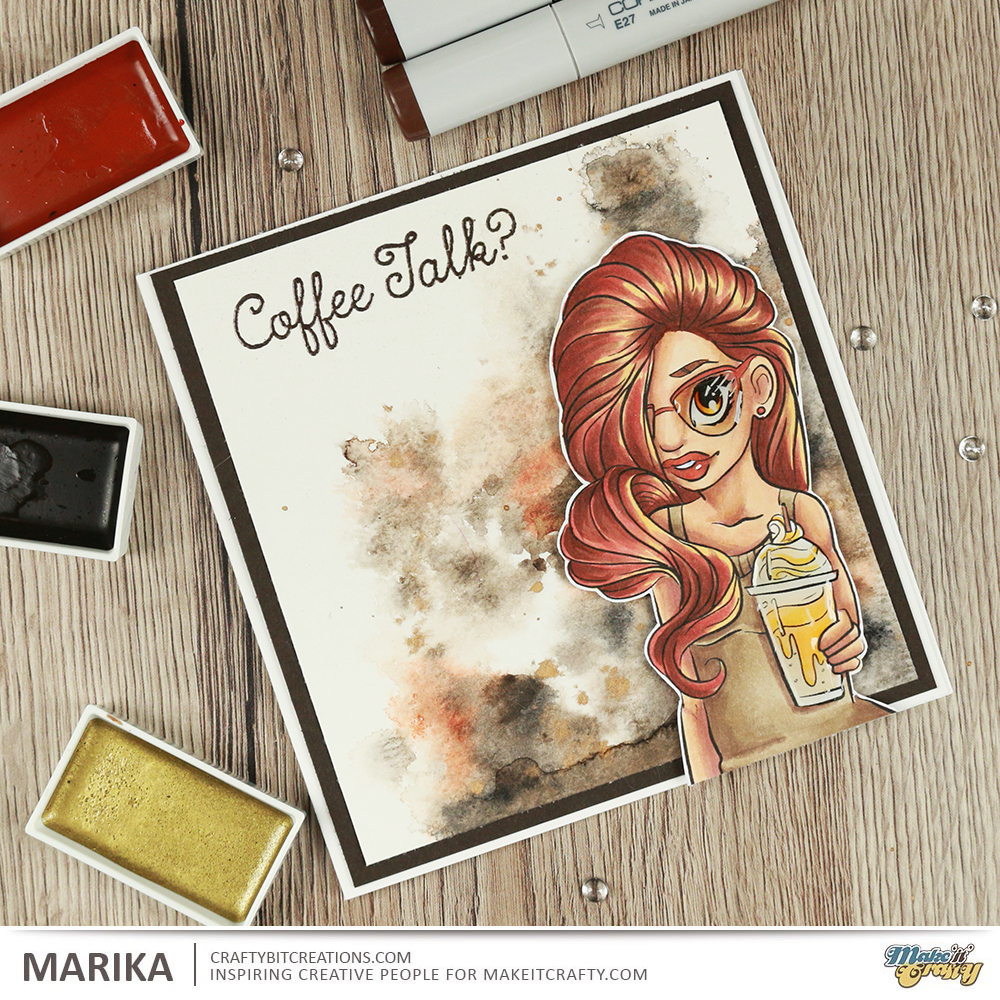
For the card today I’ve played with an older Christmas stamp called Fairy Star that is part of the Cute Christmas Fairy Collection, both which are on sale at the moment! If you want some more fun inspiration with this fairy stamp I have an old video where I made a card with it, which you can find HERE. The challenge is glow so decided that I wanted the star wand to glow. I wanted the glow to be subtle, to let a little bit of the base colour to show, so I added the lighter colours on top of the glow yellow.

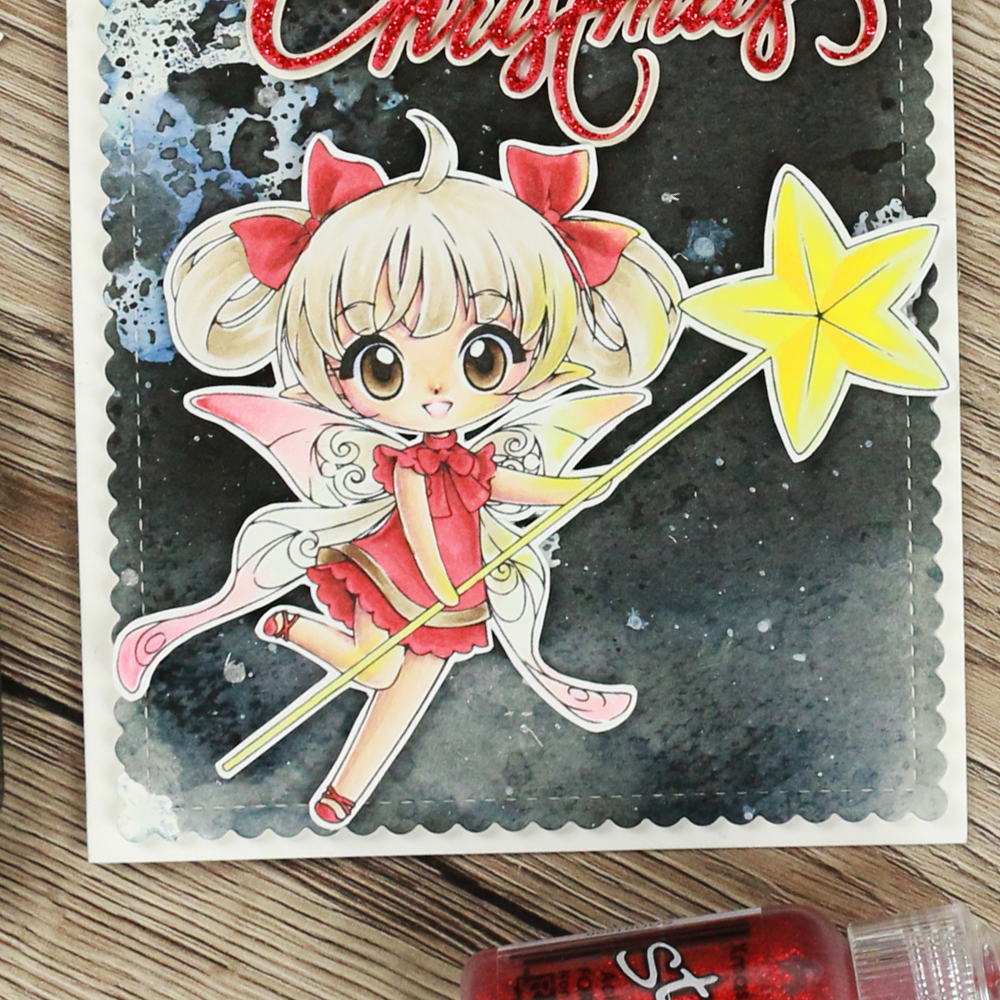
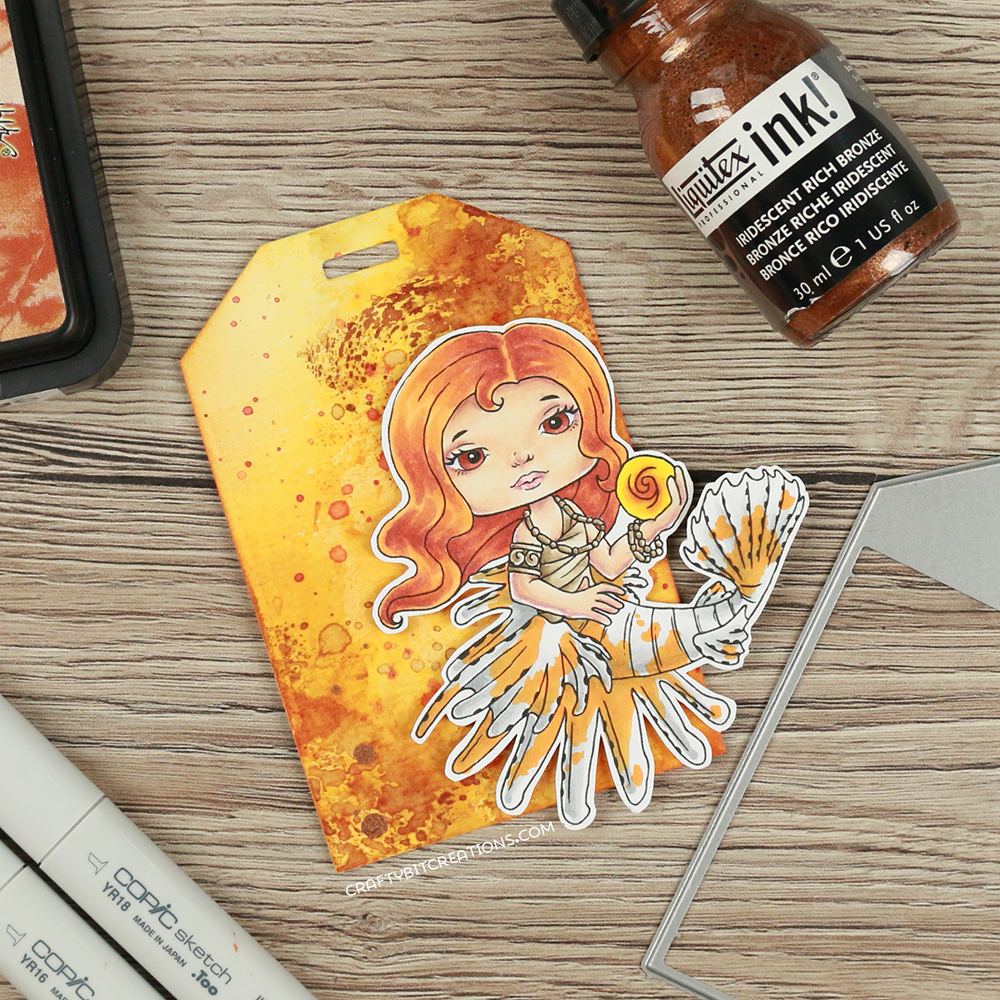
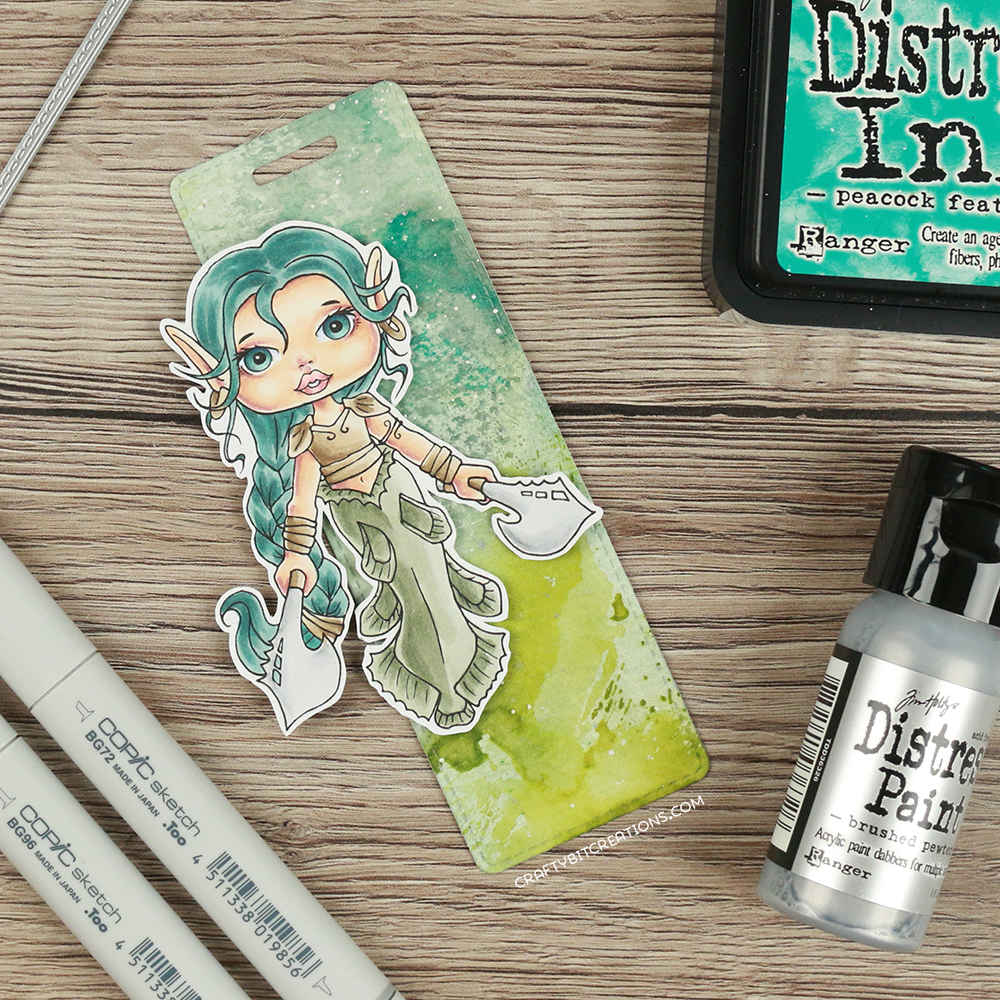
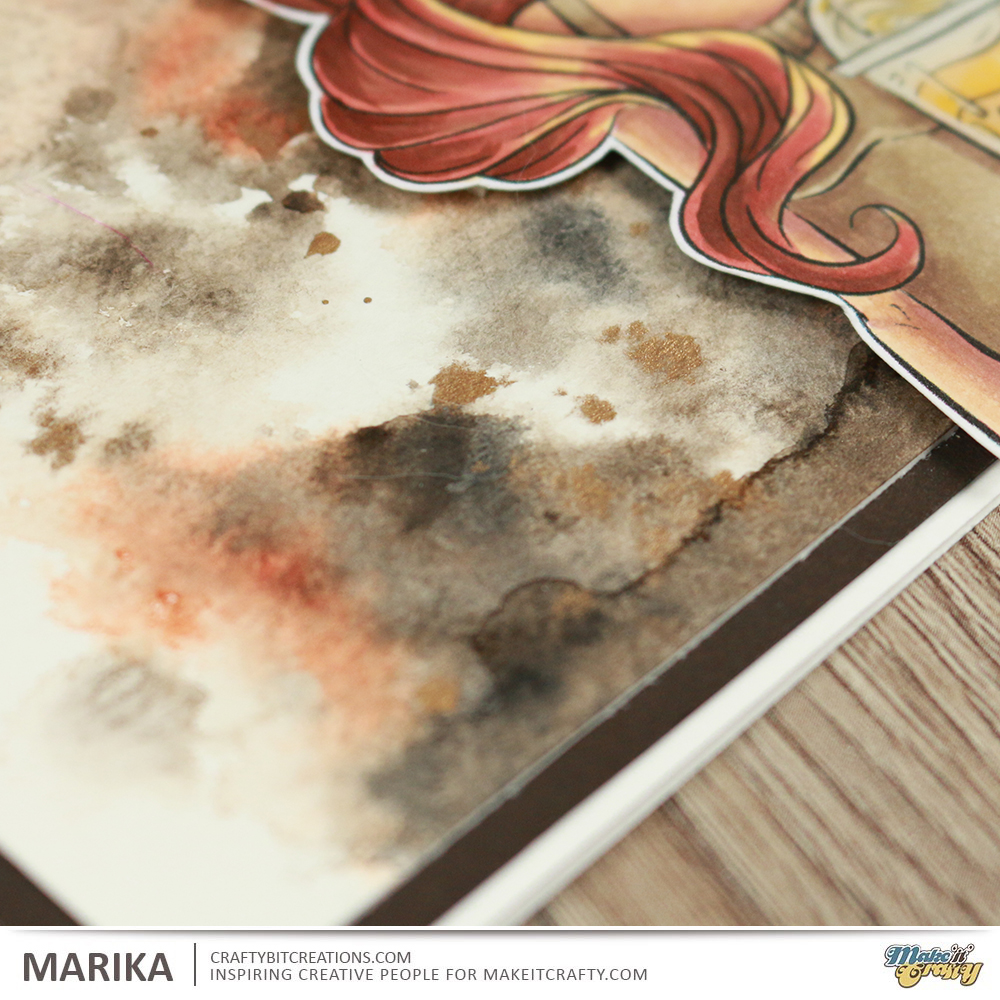
To make it into a card, I made a background by smootching distress inks on top som Montval watercolour cardstock and then using a die to cut it out. For sentiment I used the Christmas Word Chipboard and Christmas Adapt-a-Word chipboard set  which I coloured with distress paints, I also added some red Stickles glitter glue to the Christmas word. To finish it off I added a little Star Snowflake.

Now come join us with the challenge! Remember we all start somewhere, and these challenges are a great place to learn new things.

Copics:
Skin: E50, E00, E21, E11, E04, R30, R32
Reds: R24, R27, R59, E44
Browns E40, E41, E42, E43, E44, E47, E49
Yellow: Y00, Y02, Y04, Y17, Y38
Glow: Y00, Y02
Wings: E42, E41, R30, R32

Supplies:

When possible affiliate links are used, this means that I receive a small commission when products are purchased through the links (at no extra cost to you) I use the money to support my blog and youtube channel. If you like my projects and tutorial please consider supporting me by clicking through these links when you shop. Thanks!

https://linkdeli.com/widget.js?1549439153802
Uncategorized

Polka Dot Pals Add-on Faces

It’s the release that you’ve been waiting for … the new and improved Polka Dot Pals Add-on Faces is here! These adorable and quirky faces are a fun way to customize your Polka Dot Pals rubber stamps. The clear stamps also make it easy for placement. This set features 32 high quality photopolymer clear stamps of faces and glasses sized for both the large and small Polka Dot Pals.


We’re celebrating this release with a grand sale AND we have some fabulous guests that have joined us! Visit each of the four days for inspriation and get your Polka Dot Pals Add-on Faces today.

Let’s celebrate! 

Emma Louise (Guest) [https://emmascraftycards.wordpress.com/]
Katya Bess [http://kattyxotica.blogspot.com/]
Lisa Johansen [http://www.snowymoosecreations.com/]
Barbara [http://forgottenscraps.blogspot.com/]

During these four days … 

Buy the new Polka Dot Pals Add-on Faces and you’ll also receive the Little houses clear stamp FREE!

15% OFF all Little Miss Muffet brand stamps
(Check the Make it Crafty section too for some holiday sales)

Lastly, you’ll get FREE US shipping on mailable orders over $35.00 or a $5.00 shipping credit for International Order. There’s no better time to shop for rubber stamps at Little Miss Muffet Stamps. Oh yeah!

All promos are automatically added to the cart during checkout – no coupons needed!

And now for my project!

I just love the faces, I usually done custom faces on the Polka Dot Pals, but I can often feel that I’m giving them the same face over and over. With these faces the possibilities are endless!

I’m a mermaid fanatic, and these mermaids are just awesome! After creating the first one I just had to print a couple more with different faces and then I went crazy with the backgrounds. They all are using the same technique, but I love the third one most, which is your favourite? The technique used is a combination of smooching and blending using distress inks.

Copic:
Skin: E50, E00, E21, E11, E04, R30, R32
Blues: B21, B45, B37
Greys: C0, C2, C4, T0, T2, T4
Orange: YR04, YR15, Y16, Y18, E07, E08, E09 R05
Green-Blue: BG72, BG18, BG75, BG90, BG93, BG96
Brown: E40, E41, E42, E43, E44

Supplies:

When possible affiliate links are used, this means that I receive a small commission when products are purchased through the links (at no extra cost to you) I use the money to support my blog and youtube channel. If you like my projects and tutorial please consider supporting me by clicking through these links when you shop. Thanks!

https://linkdeli.com/widget.js?1549439153802
Uncategorized

Elphaba Wishing You A Happy Halloween

Hi Everyone!

I’m a little bit late out with this, hope you all forgive me. Anyway Elphaba is wishing you a Happy Halloween!

Make It Crafty have these wonderful backgrounds but sometimes I struggle to make the card look clean when I use backgrounds. But I thought I would show you today how you can keep your card looking clean but still use them.

So I have a few steps that I go through when I create a card with a coloured background. This time around I didn’t add the focal image (Elphaba) to the background, instead I decided to colour her separately this makes placing a little bit easier as I do it after I coloured the images and there for can take the depth into account.
Also when printing the images I choose to use different lightness on the lines. Elphaba is printed in blank, while the fence is lighter and the house even lighter. This helping me when I colour as lighter things looks further away than darker and crisper images. And the last tips on colouring backgrounds is that I’ve chosen more muted colours for the background making the image stand out (also the muted colours also will makes things look further away).

The last thing I did for this card was to crop the background and place it on the side, both to help me place Elphaba better (I think I printed her a little bigger than I should have). But also to make room for a sentiment. The sentiment is one of the wonderful chippies also from Make It Crafty, I’ve coloured the back piece white, and the smaller piece black, both with Distress Paint. Then I added stickles on top, to give it a little extra pop.

When it came to Elphaba herself I’ve chose to have a limited colour palett. Choosing to give her green hair because it’s awesome, I left the rest of her very neutral as then you will be drawn to her pretty face.

By the way Make It Crafty have a 20% discount of chippies! So head over there and get some, they are wonderful to work with and just completely beautiful.

Craft on! Love Marika

Copics: W0, W2, W4, W6, W8, 100, YG00, YG01, YG03, YG05, YG17, YG91, YG93, YG95, BG70, BG72, BG75, E40, E41, E42, E43, E44, E47, E49

Supplies:

When possible affiliate links are used, this means that I receive a small commission when products are purchased through the links (at no extra cost to you) I use the money to support my blog and youtube channel. If you like my projects and tutorial please consider supporting me by clicking through these links when you shop. Thanks!

https://linkdeli.com/widget.js?1549439153802
Uncategorized

Hello Pretty Pumpkin!

Hello fellow MIC lovers!

I’m here with a new card, you all must have seen the new to Make It Crafty images by Krista, which by the way is just awesome! Well I’ve used Pretty Pumpkin today and even though it lends itself to really strong fall colours with the girl holding the pumpkin and all I just needed to be different didn’t I ;). I had coloured her skin and was debating with myself which hair colour she should have, the only thing I knew was that I for once didn’t want to use the same colour scheme as Zoe, she is awesome at choosing colours.  So I picked out my lightest browns, the E40s and then the colour scheme just came together.

For the background I played with my go to smooshing technique, I want through 3 other backgrounds until decidingon this one. Using Tattered Rose, Weathered wood for the smooching and then splattered some Worn Lipstick and Ground Espresso over it.

For the last details I used some wonderful chippies also from Make ItCrafty. I have stars in three different sizes and the Hello sentiment. I coloured them with Distress Paint, and as I didn’t have either Worn Lipstick or Tattered Rose as paint I choose to blend some Abandoned Coral with some Picket Fence, I also didn’t have Weathered Wood so the grey stars are a metallic paint called Brushed Pewter, I then covered them all with some nice glitter glue.

Copic:
E40, E41, E42, E43
E50, E00, E21, E11, E04
R30, R32, R35
N0, N2, N4, 0
B21, B23, B34

Supplies:

When possible affiliate links are used, this means that I receive a small commission when products are purchased through the links (at no extra cost to you) I use the money to support my blog and youtube channel. If you like my projects and tutorial please consider supporting me by clicking through these links when you shop. Thanks!

https://linkdeli.com/widget.js?1549439153802


https://linkdeli.com/widget.js?1507211696881

Uncategorized

Witchy Concoctions

Hi Everyone!

We all have periods in our life when we struggle for ideas, so to kickstart ours the MIC DT is playing with CASEing each others cards. CASE means Copy And Steal Everything, but just because you copy and steal you don’t need to get a card that is looking just the same.

I CASEd Deborah’s card and chose some key elements to copy but using different materials and colours. Come and join us and share your CASEing of Deborahs card in the Make it crafty facebook group.

Copic:
Blacks & Greys: C0, C2, C4, C6, C8, C10
Browns: E40, E41, E42, E43, E44
Greens: YG00, YG01, YG03, YG05, YG17
Skin: E50, E00, E21, E11, E04

Supplies:

When possible affiliate links are used, this means that I receive a small commission when products are purchased through the links (at no extra cost to you) I use the money to support my blog and youtube channel. If you like my projects and tutorial please consider supporting me by clicking through these links when you shop. Thanks!

https://linkdeli.com/widget.js?1549439153802

Uncategorized

Create A Smile Comeback Video Hop

Hi Everyone!

Today I have the honor to take part in the Create A Smile Comeback Video Hop, a lot has happened but Christine is finally back with a new brilliant release!

I have chosen to use the In Bloom stamp set and combined that with the older but still wonderful This Must Be Love stamp set. I’m also channeling my inner Kelly Latevola and playing with a combination of Distress Inks and Copic Pens. I haven’t had loads of time crafting lately, with me getting a new job and dyeing fabrics, the time sort of flew away. But I’m back at the craft table and hope to be able to stay there awhile.

Copic:
YR12, YR15, YR16, YR07, YR09, Y19

Supplies:

When possible affiliate links are used, this means that I receive a small commission when products are purchased through the links (at no extra cost to you) I use the money to support my blog and youtube channel. If you like my projects and tutorial please consider supporting me by clicking through these links when you shop. Thanks!

https://linkdeli.com/widget.js?1549439153802
Uncategorized

Funky Girls Bloghop

We are incredibly excited to have a chance to share our love of Krista Smith’s gorgeous illustrations with you through Make it Crafty. Zoe has always been an admirer of her designs and it is a great honor to have an opportunity to work with her.

Today, the design team and special guests have added their magic to these gorgeous images to offer you lots of ideas on how you can get creative with The Funky Girls collection.

Chance to become a guest designer!!

As you soak up the inspiration, leave some love along the way as Zoe will be offering two random commenters a chance to guest on the Make it Crafty team for two months! We want you to come join the fun at Make it Crafty and be part of the team! The winners will receive a package of chippie goodness to play with and access to design and create with images from the digital stamps available in the store. Winners will be contacted on Monday 10th of July to confirm they would like to be our guest.

So let’s get on with the inspiration!

For my card today I have played with Frappe Delight, being a coffee lover I was so thrilled when I found this one! My card is put together with inspiration from everywhere! The colour scheme is taken from coffee and also from wanting the girl to look a little bit latino. I have layered her hair with loads of different Yellow Reds and Browns to build up the colour I wanted and then I choose more simple colours for her shirt to make the hair be the focal point. To make the frappe stand out I chose to add Glossy Accent to it, and also to the glasses. And for the background I played with my very new Gansai Tambi Watercolours, the 36 set comes with a copper one that just gave the background that extra little thing.


Blog Hop List

Here is the blog hop list to help you find your way.

Zoe
You Are Here
Andrea
Rosie
Delphine
Lou
Deborah
Anja
Sadia
Ruby
Nicoletta
Faye
Store Blog


Thank you so much for hopping on by today.


Uncategorized

Distress Oxide Inks – Backgrounds

MFT-Mermazing-Oxides-Thumb

Hi Everyone!

I just got my Distress Oxide Inks in from Simon Says Stamp, I’ve seen so many fun things done with them so I just had to get them. I immediately sat down to play and out of it I got four different backgrounds with four different techniques. So todays video is all about those background, I knew that I wanted to finish the cards with the Mermazing stamps set from My Favorite Things that I also picked up at the same time. So I choosed to use the same three colours in all four techniques. Faded Jeans, Broken China and Peeled Paint. To finish the cards I also used the Clear Droplets from Pretty Pink Posh, which is one of my favourite sequins.

The different techniques I used was, first smooching, I just had to try it on the oxide inks and it works great however you get a whole other effect due to the pigment in the oxide inks which gives you much thicker washes of colours and layers that you wouldn’t be able to get with ordinary inks.

MFT-Mermazing-Oxides-Rednhair-Blog

The second technique is using Distress Micro Glaze, while researching the Oxide Inks I found a video with Tim Holtz and he was using the Glaze and I just had to try it, I’ve had this pot in my stash for a year I think and I haven’t really used it. You do have to clean off the tools you used with alcohol but this was real fun! Apparently it works with all Distress products except the crayons.

MFT-Mermazing-Oxides-Bluehair-Blog

The third technique is combining blending and stamping, I just had to try stamping as these inks you can stamp with and get great result, I used the MFT Cheesecloth background stamp together with Faded Jeans Oxide Ink. This is the only technique where I only use one ink colour, but as you can see you can get great results with just one colour.

MFT-Mermazing-Oxides-Brownhair-Blog

The fourth technique is just plain blending, I tried this multiple times with different papers, but I only show one as I wasn’t happy with the result on the first ones. The big difference came when I used the Bristol Cardstock, the ink glided on like butter!

MFT-Mermazing-Oxides-Greenhair-Blog

On the blue haired mermaid I’ve used one of the less perfect backgrounds for the sentiment flag, the technique I used there where to go directly to paper with the inkpads, I didn’t like that the inks didn’t really blend when I spritzed it with water, however I think that technique can give you awesome results, it wasn’t what I wanted for these backgrounds tho so I didn’t include the clips on me creating it.

I ended up making four cards out of the backgrounds, playing with the Mermazing stampset by My Favorite Things. I stamped these images onto Make It Colour Blending Cardstock with Memento Tuxedo Black Ink in my Mini Misti, and then colouring them with copics. I only left in the colouring for one of the mermaids in the main video but I did make a second, real-time video with all of the colouring of all of the mermaids if you want to see that. I finised of the cards making sentiment flags with the sentiment from the stampset and a die from the Tag Builder Blueprint Set 5.

Copic:
Skin: E50, E00, E21, E11
Olive Skin: E34, E55, E44, (Y28)
Red Hair & Tail: R00, R02, R05, R29 (R14)
Blue Hair & Tail: B12, B06, B37, B39
Green Hair & Tail & Turtle: YG01, YG03, (YG25), YG17, (YG67)
Rock & Greys: T0, T2, T4
Sea Shells & Fishes & Stars: YR21, (YR12), YR15, YR07
Blue Gray Tail: B21, T0, T2, T4

Supplies:

When possible affiliate links are used, this means that I receive a small commission when products are purchased through the links (at no extra cost to you) I use the money to support my blog and youtube channel. If you like my projects and tutorial please consider supporting me by clicking through these links when you shop. Thanks!

https://linkdeli.com/widget.js?1549439153802
Uncategorized

Mini Hellos & A Comparison

Hi everyone!

I’m back with not one but two videos today, I’ve been wanting to try out a whole bunch of different watercolor-cardstocks figuring out which is best for different techniques. I have recently bought some of the Arches as it’s been so raved about and I wanted to know if it is better for the techniques that I usually do.

So todays first video is all about that smooching technique, and as I was already to go I decided that I would try out some different medias too. So the papers are in the order:
1. Dekorima Water Colour Pad
2. Crafter’s Companion Watercolour Card
3. Tim Holtz Distress Watercolor Cardstock
4. Canson Monteval Aquarelle 300gsm
5. Arches Aquarelle 300 gsm

For the first round I chose to go with my favourite media for the smooching technique, my loved Distress Inks, I used one 2,75″ square out of each paper and did the smooching with. And I was surprised of how well all the papers held up!

All-paper-distress-inks

For the second round I used my Zig Clean Color Real Brush Markers, I never used these before for this kind of technique but they worked out well, I will most definitely use them again.

All-paper-real-brush

For the third round I used my Distress Crayons, these are some that I really need to use more and experiment more to find new and exciting ways of using them. They also worked great with the smooching technique and brought that crayon texture in as a new dimension.

All-paper-distress-crayons

And for the final and fourth round I used some Glimmer Mists, I really like how they add that glimmer and the richness of the colours in them.

All-paper-glimmer-mist

There are so many more medias that I want to try with this technique but what I took away for this is that different papers will behave differently but for this specific technique the cost of the paper most definitely doesn’t make it better. However I do recommend the more sturdier papers for it, the cheapest of my papers was way to flimsy and it rolling up on itself made laying down that first layer more difficult than it had to be.

All-Cards-thumb

I just couldn’t not do something with the test pieces so I decided to make them into hello/hi/love cards for all of you guys! So the second video of the day will show you how I put the cards together, and even some copic colouring! There are 4 ways of entering to win one of the cards (or four if you are that lucky), one is to comment on this post, another one is to comment on the cardmaking video over on youtube, the third is to comment on the corresponding post over on my Facebook page and the last one is to comment over on the instagram post. This is my little way to say thank you for you following, watching and commenting all over on my social media! Thank you! I will draw the winners in one weeks time!

Copic:
Reds: R02, R32, R14
Blues: B41, B52, B97
Browns: E40, E41, E42, E43, E44, E47, E49

Supplies:

When possible affiliate links are used, this means that I receive a small commission when products are purchased through the links (at no extra cost to you) I use the money to support my blog and youtube channel. If you like my projects and tutorial please consider supporting me by clicking through these links when you shop. Thanks!

https://linkdeli.com/widget.js?1549439153802
Uncategorized

Storybook-esk Colouring & Card

Hi Everyone!

I’m back with the last video in the little serie, today it’s a speed version of all colouring done, this time also including the clothing and the background. And to finish it off also how I made it into a card.

MIC-Milas-Love-Heart-Blog

This whole project has been a little love of mine, it came out just how I imagined it and it also makes creating a little bit intimidating, afraid that everything that I’ll do will never match up to it. I think this is something that all creatives will face one time or another, and the important thing is to not let that feeling stop you from creating. And remember it’s from the mistakes we learn, so for every creation that do not match up to your ideal work, there is something to be learned.

Hope you enjoy this video and as always the supplies used can be found below the video. Happy Mothers Day!

Polychromos:
Walnut Brown, Nougat, Burnt Umber, Bistre, Brown Ochre, Cinnamon, Ivory, Caput Mortuum Violet, Light Flesh, Medium Flesh, Venetian Red, Warm Grey I, Warm Grey IIIWarm Grey IV, Black, Phthalo Green, Light Green, Light Phthalo Green, Helioblue-reddish, Indianthrene Blue, Sky blue, Light Cobalt Turquoise, Light Ultramarine

Supplies:

When possible affiliate links are used, this means that I receive a small commission when products are purchased through the links (at no extra cost to you) I use the money to support my blog and youtube channel. If you like my projects and tutorial please consider supporting me by clicking through these links when you shop. Thanks!

https://linkdeli.com/widget.js?1549439153802