Top banner for spring gnomes blog post showing the two cards and tag that the blog is about
Uncategorized

3 Mini Easter Cards/Tag | MFT Spring Gnomes

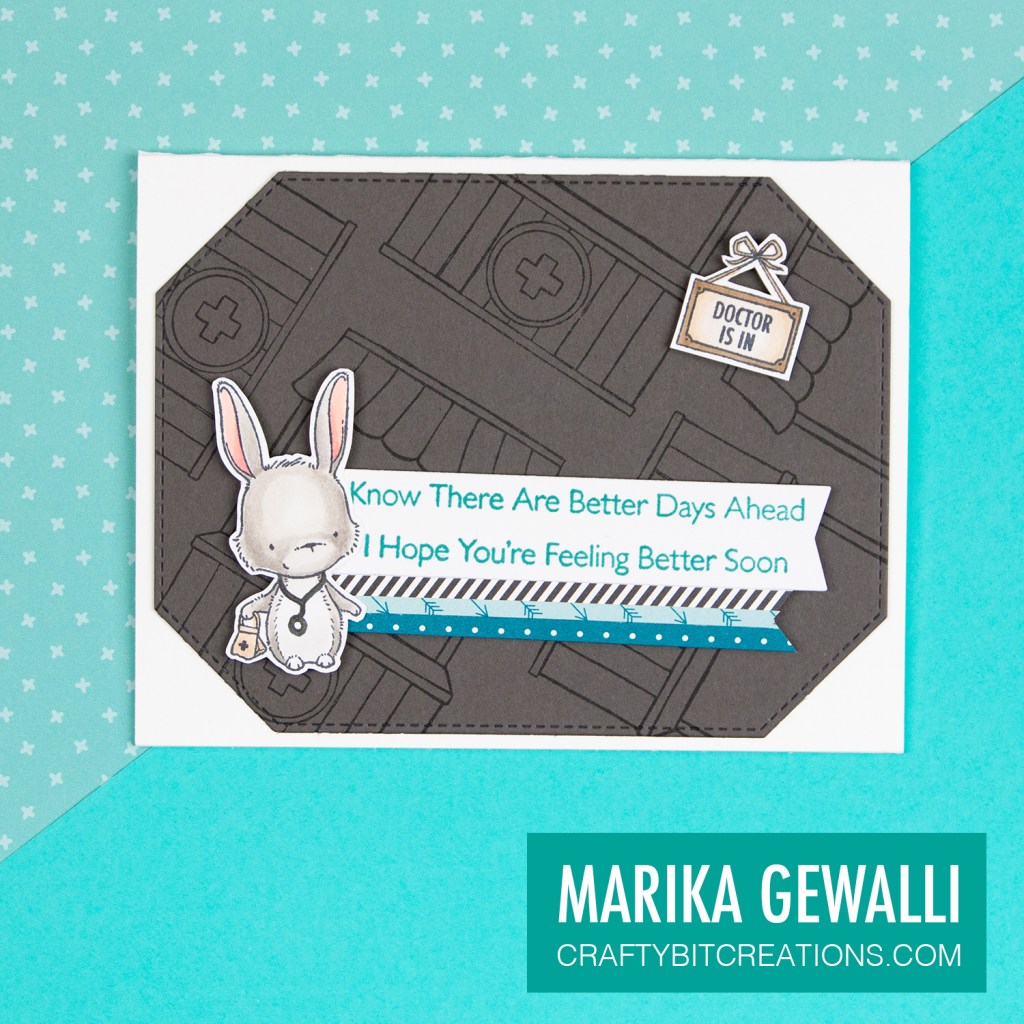
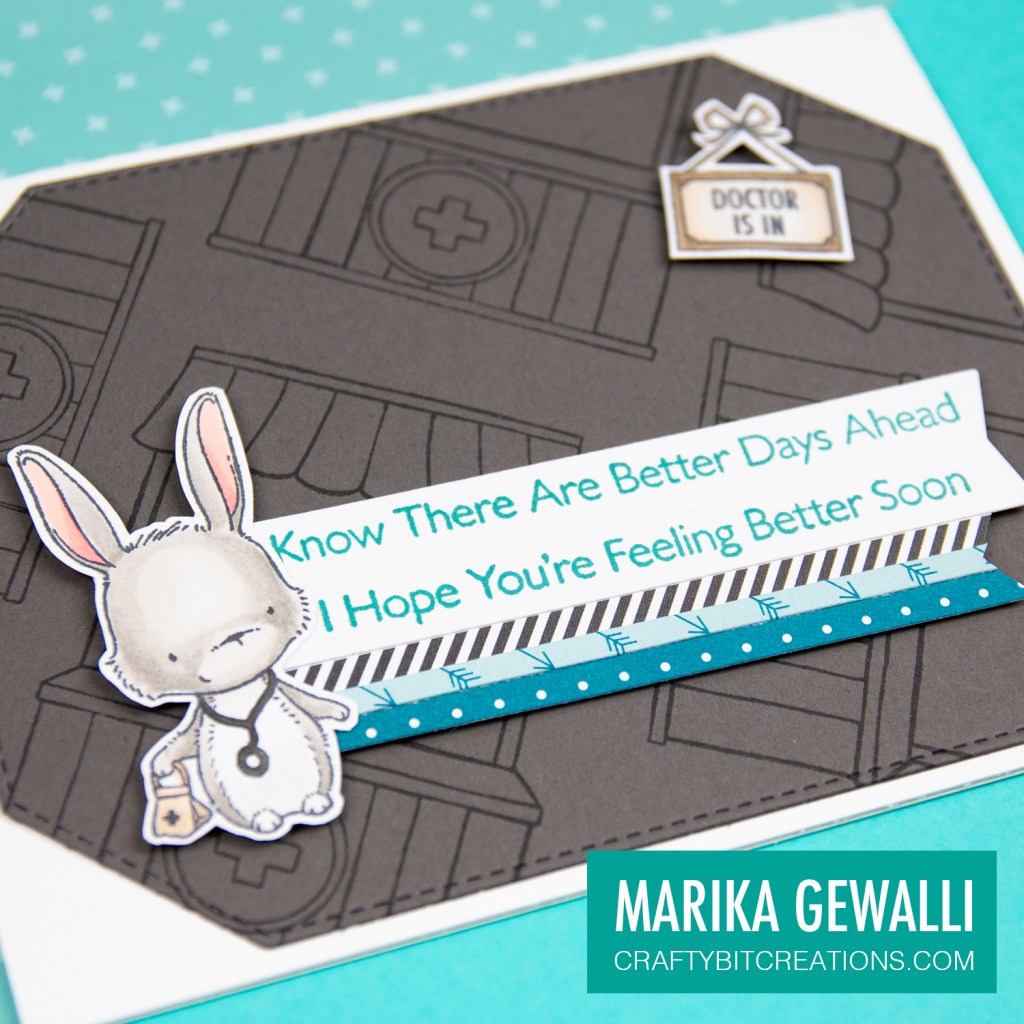
I have been in a pastel kind of mood lately, and that is perfect for easter cards. In the tutorial below I show how I made three mini easter cards using the Spring Gnomes stamp set by My Favorite Things. Well to be honest they are two cards and one tag but that would be a very long title.

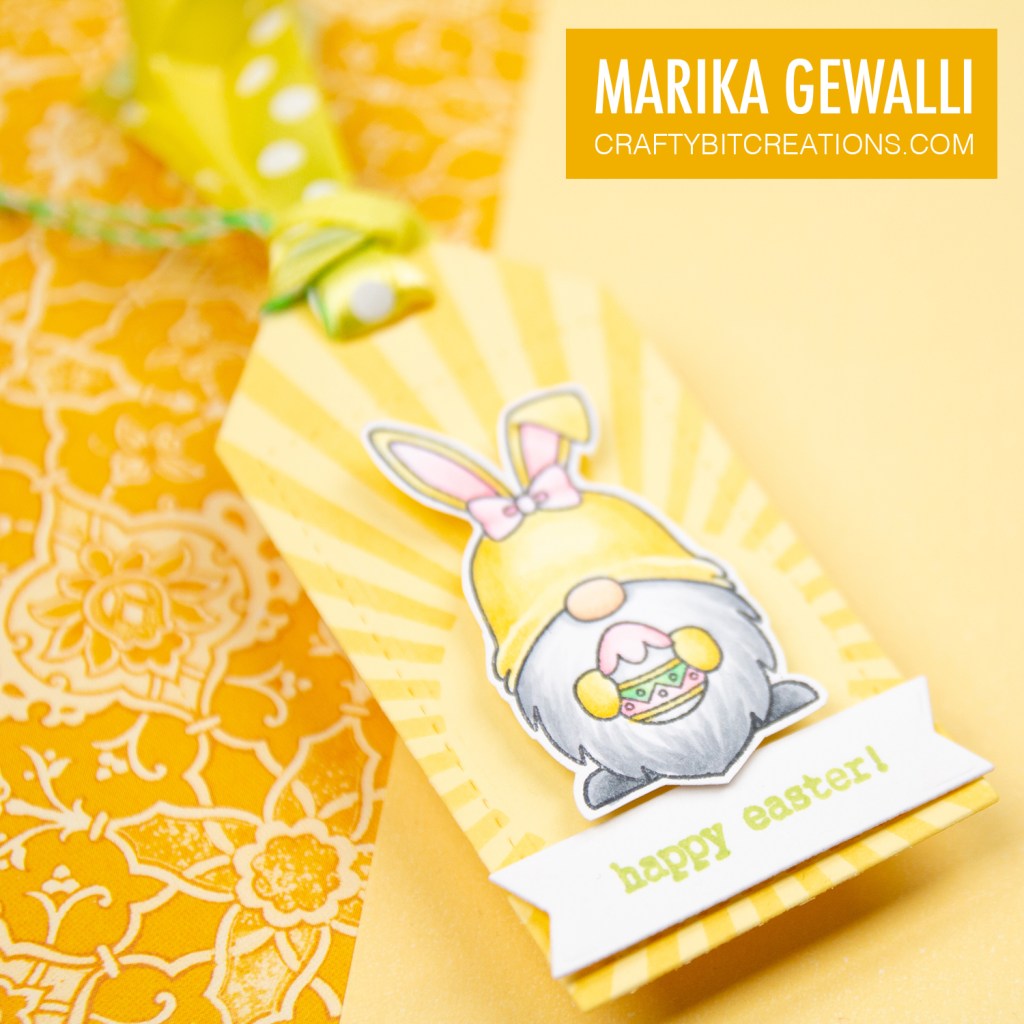
With these cards I continue to use the Lemon Chiffon card stock and ink, and for being a person that doesn’t really like the color yellow the Lemon Chiffon has gotten a ot of playing time. I did look to see if I could use another color but at this time I didn’t have another pastel card that would work with the rest of the color scheme. Which I for once picked out first, so there was no going back on that. But I’m quite happy about my choice as it worked perfect for the tag and the Sunrise Radiating Rays Stencil I used with it.

I Carrot About You card showing Bunny Gnome holding carrot

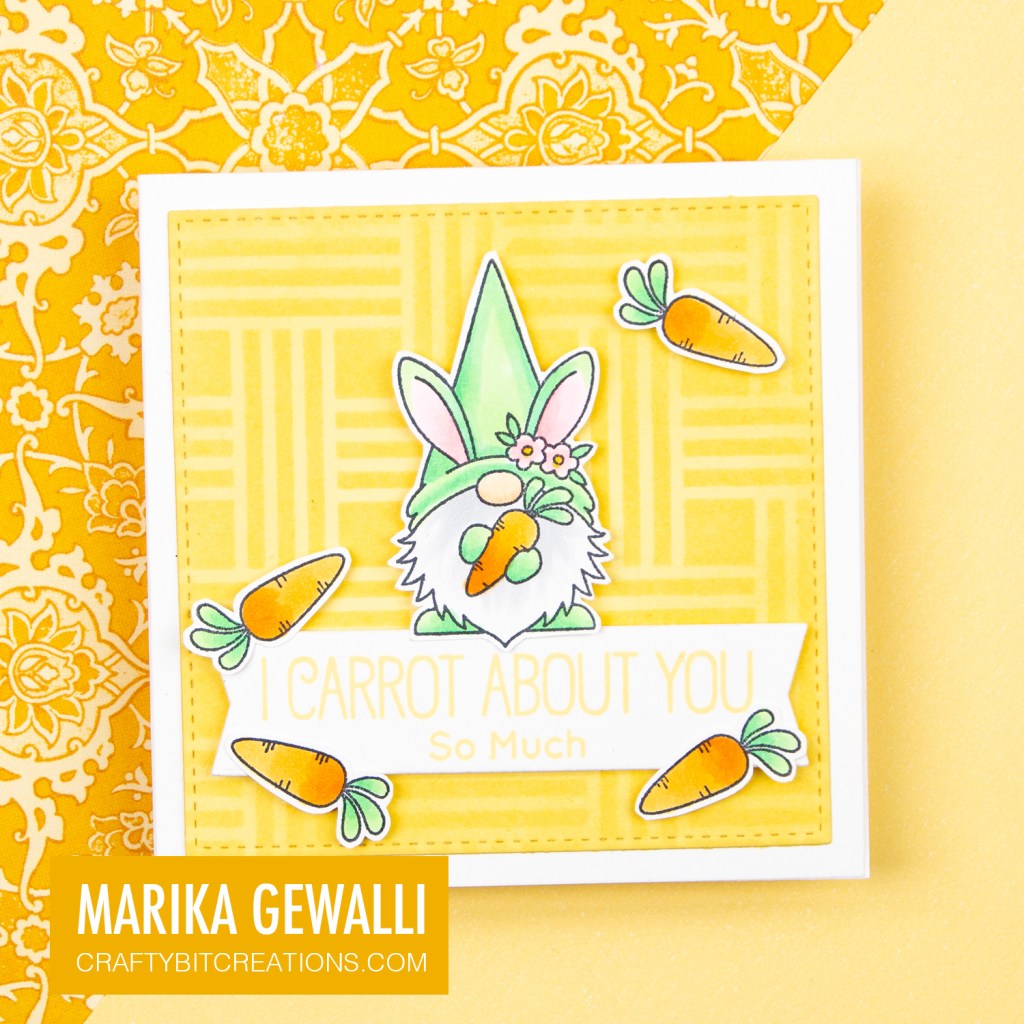
I Carrot About You So Much Card

I love making small square cards, they are quick and cute. The first card measure 3 3/4″ by 3 3/4″. The size is based on the biggest of the stitched square STAX dies. For the base layer I used a lemon chiffon square cut with that die. I then used my blender brush, the Basket Weave stencil and the coordinating ink to give the layer some texture.

For the sentiment I used my Mini Misti to double stamp the sentiment “I Carrot About You So Much” onto some Neenah with the Lemon Chiffon ink. I double stamped to get a little bit of a darker color so that it would show up nicely. Then I cut it out with a die from the Blueprints 27 Die set. I ran the die through my die cutter twice to give the sentiment two flag ends. I then added my Gnome above the sentiment and sprinkled a couple of the carrot stamps around to add a little bit more to the card.

Close up on I Carrot About You card showing Bunny Gnome holding carrot
Easter card showing bunny gnome juggling eggs.

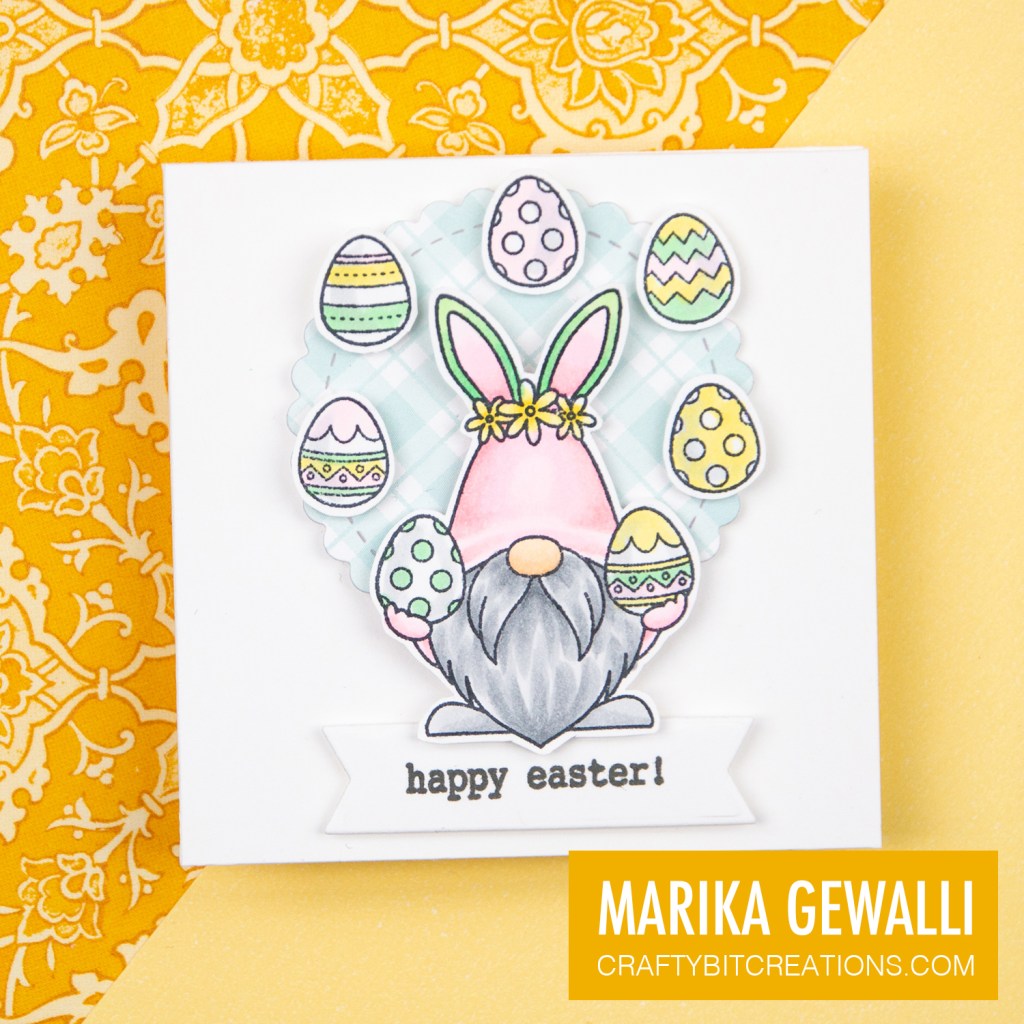
Juggling Spring Gnome Card

My second card is a 3″ by 3″ card. When I saw the little Gnome that was holding two eggs, I knew I wanted to make him a juggler. The easiest way to add the rest of the eggs in a circle was to give him a circular backdrop. So I cut a scalloped circle out of some Gift Wrap 6×6 paper. I choose a light blue green tone that wouldn’t take over to much. I added the circle on the top half of the card and a sentiment at the bottom. Then placed the gnome resting on top of the sentiment and the little eggs following the scalloped circle.

Close up of juggling bunny gnome card
Happy Easter tag with bunny gnome

Radiating Tag

The last card, which really is a tag, is another ink blended one. I again used the Lemon Chiffon card stock and ink and blended with my blending brush. This time using the Sunrise Radiating Rays Stencil, placing it so that the gnome would have the sun in his back and the rays coming out all around him. I cut the tag out with the Tag Builder 5 dies. I finished off the card with a sentiment strip under the gnomes feet and a couple of length of string and ribbon to make the tag a little longer and get some more texture and color. Hope you liked my cards and tag and that you learned something new from my tutorial. Happy Easter!

Close up of tag with bunny gnome holding egg standing above happy easter banner

Copic:

Y15, Y13, Y11, RV21, RV10, RV00, RV000, G02, YG41, YG11, N0, N2, N4, N6, E21, E00, E50, YR15, YR21, Y21

When possible affiliate links are used, this means that I receive a small commission when products are purchased through the links (at no extra cost to you) I use the money to support my blog and youtube channel. If you like my projects and tutorial please consider supporting me by clicking through these links when you shop. Thanks!

Supplies:

https://linkdeli.com/widget.js?id=f5e8378456858c916708
Masculine Get Well Soon Card featuring a bunny doctor and a little doctors in sign. With the sentiment Know There Are Better Days Ahead, I Hope You're Feeling Better Soon With Close up of bunny
Uncategorized

Get Well Soon | Masculine Card

Hi! I needed a Get Well Soon card for a person close to me (don’t we all) and as that person is more masculine I went with a grey and design with splashes of blue-green. And I thought I would take you with me, showing you how I made it.

Masculine Get Well Soon Card featuring a bunny doctor and a little doctors in sign. With the sentiment Know There Are Better Days Ahead, I Hope You're Feeling Better Soon

It was serendipity that just as I was planning for this card, My Favorite Things released the Feel Better stamp set. And as I had some time, I waited for it to arrive and then I sat down to create. In the same release they also released a bunch of new card stock and ink colors (with their new improved ink pads), so I decided that I wanted to use those colors. I did also pick up the Road Trippin Pattern Paper from a previous release (If you want to see everything I picked up you can find it HERE).

Masculine Get Well Soon Card featuring a bunny doctor and a little doctors in sign. With the sentiment Know There Are Better Days Ahead, I Hope You're Feeling Better Soon

Copic:

B000, B0000, YG00, E41, E40, R24, R30, E44, E43, E42, W2, W4, W0, R32, W8

When possible affiliate links are used, this means that I receive a small commission when products are purchased through the links (at no extra cost to you) I use the money to support my blog and youtube channel. If you like my projects and tutorial please consider supporting me by clicking through these links when you shop. Thanks!

Supplies:

https://linkdeli.com/widget.js?id=f5e8378456858c916708
Uncategorized

Haul & Swatching | My Favorite Things February 2021 Release

I love the card stocks and inks from My Favorite Things, and when they announced that they would come out with new colors and remade ink pads I jumped at it. In the video below I will show you how I make swatches for the card stock and the ink, I will also show you the rest of the products I picked up from the release.

When possible affiliate links are used, this means that I receive a small commission when products are purchased through the links (at no extra cost to you) I use the money to support my blog and youtube channel. If you like my projects and tutorial please consider supporting me by clicking through these links when you shop. Thanks!

Supplies:

https://linkdeli.com/widget.js?id=f5e8378456858c916708
Top bar showing a cut version of the closeup of the lower right corner.
Uncategorized

Shadow Box Card Tutorial | Princess & Unicorns

Hi! Today I made a shadow box with unicorns and princesses, everything I love! The video tutorial goes through how to cut, score and put everything together, but I have also made an instruction sheet that you can see below and you can find it as a pdf HERE.

Showing the full shadow box card with the princess as focal image.

Making a shadow box means some measuring and scoring and if you find that hard (or boring), there is dies out there. One that also flattens to an A2 card size like the box I have done is the one from MFTStamps.

In the video below you can follow along on how I did my box out of less than one sheet of letter sized card stock. Also you can see how I decorated it using stamps from the Pretty Princess and Friendly Unicorn Stamp sets. You can find all the products used listed below, and there you also find all the copics used to color the stamps. Which you can see how I did in the second video.

For the shadow box I cut out 2 pieces measuring 5 7/8″ by 4 1/4″ for the back and front, and 4 pieces measuring 3/8″ by 4 3/4″, 2 for upper delimiters and 2 for bottom delimiters. The 5 7/8″ by 4 1/4″ should be scored on the long side at 4″ and at 5 1/2″, and the delimiters should be scored at 3/8″ on both ends. Before putting together the card, take one of the bigger pieces and cut a hole out of the 4″ part of it. Make sure that the hole has a minimum of 3/8″ to all edges so that the tabs aren’t seen from the other side. I used a die for this as I wanted to have cute scalloped edges for my window. Putting together the card, use a strong tape so that it stays together, I use sookwang tape. You can follow the instructions below and I have made a pdf that you can download HERE.

Instuctions for the shadowbox, sizings and scorelines.

After putting together the shadowbox it’s now time to decorate! I used stamps from the Pretty Princess and Friendly Unicorn stamp set. I colored them with copic markers and then cut them out (there is dies, but I prefer to fussy cut). Then blending Tumbled Glass and Cracked Pistachio Distress Inks over the for Mini Cloud Edges stencil the backdrop and Cracked Pistachio and Twisted Citron Distress Inks over the Grassy Edges stencil to give some dimension and texture. For the hanging clouds and the back unicorn and chariot I used acetate to fasten them so that it’s harder to see how they are attached. To finish it off I ended up white heat embossing a sentiment on some Peach Bellini card stock.

Close up of the lower right corner of the shadow box depicting the sitting princess who hugs a sitting unicorn.
Close up of the unicorn in the back of the shadowbox card.
Closeup if the chariot on layer 2 of the shadowbox
Close up of the upper part of the shadow box, showing three crowns.

Hope you enjoyed the tutorial and I’ll see you back here soon! Happy Crafting!

Copic:

E21, E00, E50, R32, R30, YR23, YR21, YR20, R000, B0000, B000, Bo1, G02, Y13, YR12, V12

When possible affiliate links are used, this means that I receive a small commission when products are purchased through the links (at no extra cost to you) I use the money to support my blog and youtube channel. If you like my projects and tutorial please consider supporting me by clicking through these links when you shop. Thanks!

Supplies:

https://linkdeli.com/widget.js?id=f5e8378456858c916708