Uncategorized

Christmas In July – Masculine Christmas Card Tutorial

Oh gosh! It’s been ages! More than a month to be exact. Last post was the start of the 30 Day Coloring Challenge, and I did not finish it. I thought that my energy was coming back but was hit with some really stressful news (don’t worry it’s all fixed now) so I got sick and haven’t been able to craft at all since. But I’m back today with a Christmas in July card.

I did record this in December but didn’t have time to edit it before I went on vacation, and I finally did! I really really love how the coloring came out so I’ve been eager to share it with you.

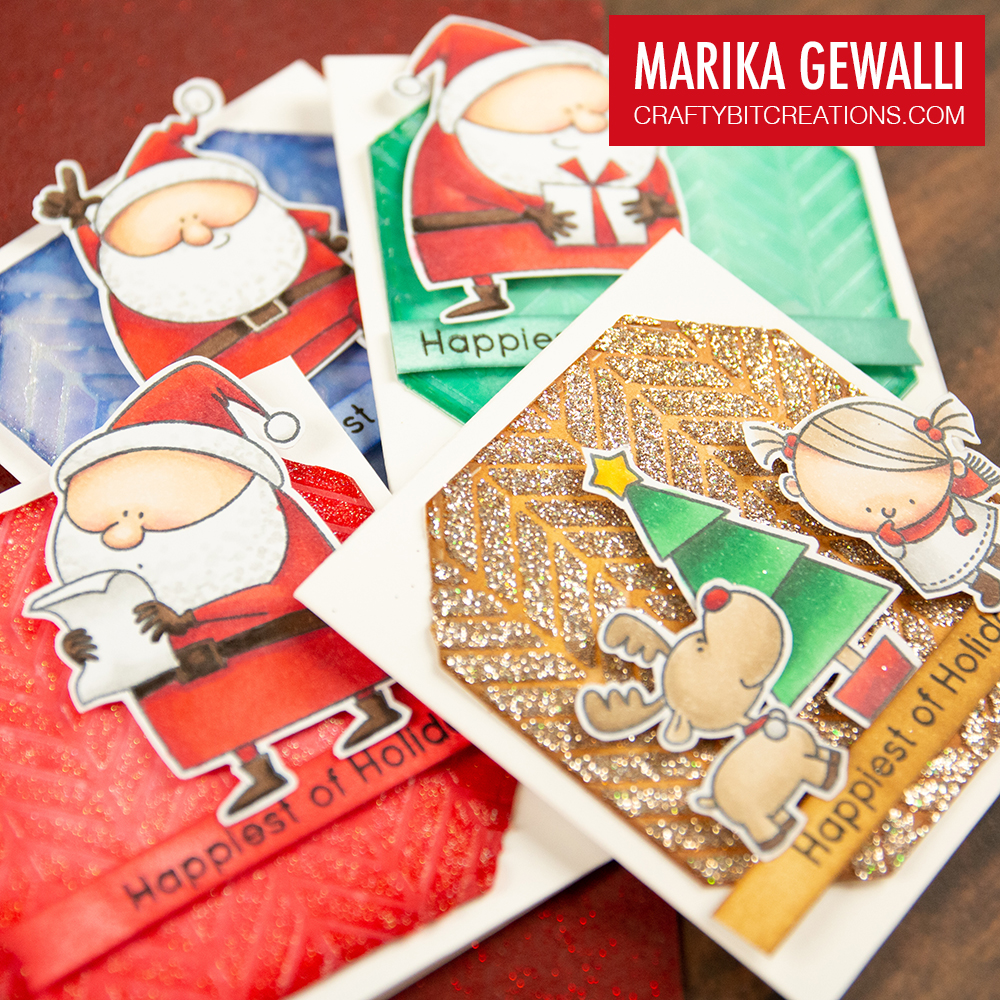
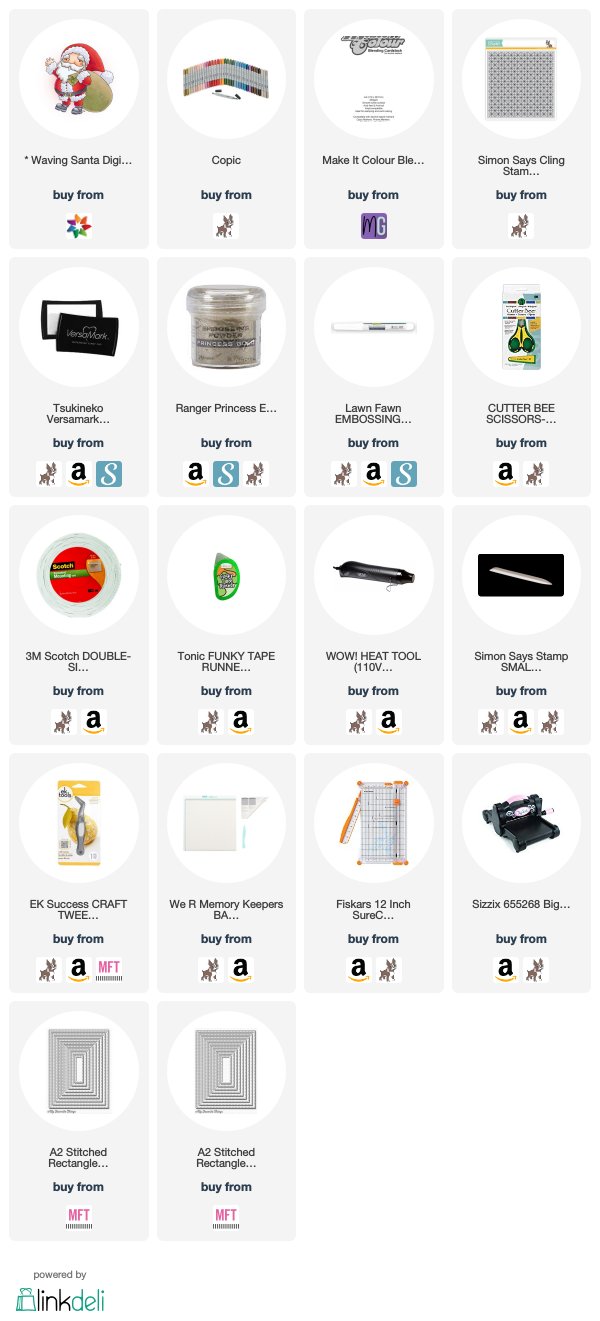
The stamp is a digital stamp from Make It Crafty called Waving Santa. I went with the standard Christmas colors, and the card actually went very masculine when I finished it and again really liked the finished card. The background is a masked background stamp from Simon Says Stamp together with a sentiment stamp from My Favourite Things. Super simple but still packs a punch.

I also decided to make a real-time coloring video from the coloring as I had more things to say about the coloring that would fit in a standard card video. Hope you enjoy them both! In the coloring video I bring up a bunch of coloring people I love, so thought I would link them here too 🙂

Jennifer: http://just4funcrafts.com/
Zoe: http://makeitcrafty.com/crafts-blog/
Rhea: https://passionatepapercreations.blogspot.com/
Faye: http://www.stampinfluffnstuff.co.uk/
Stephen: http://stampinsteve.blogspot.com/
Barbara: http://forgottenscraps.blogspot.com/

Copic:

E000, E00, E21, E11, E04, R30, R32, B24, B37, B63, W00, W1, W3, E42, E43, E44, E47, R24, R37, R39, R89

Supplies:

When possible affiliate links are used, this means that I receive a small commission when products are purchased through the links (at no extra cost to you) I use the money to support my blog and youtube channel. If you like my projects and tutorial please consider supporting me by clicking through these links when you shop. Thanks!

https://linkdeli.com/widget.js?1559654439292
Uncategorized

4 Ways To Use 3D Gloss Gel For Backgrounds – Christmas Edition

Hi Everyone! In todays tutorial I will show you 4 different ways to use 3D Gloss Gel by Prima for backgrounds. I love using pastes and gels to add texture to my backgrounds, it’s that small change that makes the big difference that I love!

 For my cards today I’ve chosen to try different ways to add glitter, to make it pop a little better I’ve ink blended the background diets in different colors, using one lighter and one darker. I also choose to use the same stencil for all of the backgrounds to make the differences between the different techniques a little bit clearer. And to finish them off I’ve used some of the stamps I coloured up for the 30 day colouring challenge that is going on throughout November. If you wanna see the colouring of all of those images I will be sharing that in a couple of colouring videos coming up later in November/December.

So back to the backgrounds, the first background is on a green diecut. I start out using the Gloss Gel on it’s own, I did use that on my card last week, but felt it would be a great for comparison to have it here too, and also I love the simplicity of it.

The second card is on the blue diecut, here I added shimmer underneath the 3D Gloss Gel, of course I didn’t really take in consideration that the shimmer pen would react with the distress ink and the full impact of that didn’t show until the gloss dried. It did give a cool effect, but maybe not was I was after.

The third card I mixed in glitter into the gel, I really really liked the result, this also reduces the need to buy all the different glitter pastes as you can mix any kind of glitter into your paste! I ended up making two card with this mainly because I mixed a little bit to much, so the left over I spread on an extra background diecut. I think I like the white on white effect the most, however it doesn’t photograph that well.

For the fourth and last card I added the glitter on top of the gel. I think I loved this background the most, however the glitter do transfer a bit, so if you don’t like getting glitter everywhere this technique might not be for you.

If you read this long I want to thank you for visiting my blog and I would like to ask you if you have any other materials you want me to use for upcoming 4 ways tutorials? Hope you have an awesome day!

Copic:
E41, E42, E43, E44, E47, E49
R24, R46, R39,
E000, E00, E21, E11, E04, R30, R32
T0, T2, T4, 0
G03, G17, G29
Y08, Y38

Supplies:

When possible affiliate links are used, this means that I receive a small commission when products are purchased through the links (at no extra cost to you) I use the money to support my blog and youtube channel. If you like my projects and tutorial please consider supporting me by clicking through these links when you shop. Thanks!

Uncategorized

Clean & Simple Christmas – Upgrade the Background

Hi Everyone! Marika here with another card and tutorial. Todays card is based on a wonderful chipboard sentiment from Make It Crafty. I wanted it to be the main part of the card so I concentrated on making the background simple and clean to make that sentiment pop just a little bit extra. 

After doing the ink blending I felt that it was a little bit to clean, I wanted to add some more texture to it. So I whipped out a stencil from Create A Smile Stamps and one of my newest purchases, a tub of 3D Glossy Gel from Prima. The glossy gel is like a texture paste but in gel form so it makes a very soft and glossy texture and that paired perfectly with texture from the watercolour card stock I used for the blending. 

To finish it up I picked out a sentiment from Tweet Holidays by My Favourite Stamps that ended in Christmas, and then cut the Christmas away and letting my chipboard word being that last word. It was a real fun card to make and relatively quick, not counting the drying time of that gel tho.

Supplies:

When possible affiliate links are used, this means that I receive a small commission when products are purchased through the links (at no extra cost to you) I use the money to support my blog and youtube channel. If you like my projects and tutorial please consider supporting me by clicking through these links when you shop. Thanks!

Uncategorized

Peekaboo Pull-Tab Card | Save The Crafty Youtuber Video Hop 2018

Hi Everyone! It’s time for me to join the Save The Crafty YouTuber Video Hop for 2018. This is a hop where over 90 Craft Youtubers come together for 5 days to share their love for crafting but also their viewers, come hop with us and maybe you can find some new youtube crafters to watch!

The hop is circular so where ever you start just hop on for that day, but you can find all the information over at the creator, Justine Hoveys blog. There are some great sponsors and that means that there is some great giveaways! Everything is happening on youtube, so to be in to win hop over to my youtube channel and after watching my video you will find the next crafter in the hop you find it as the first link in my description.

And now to the card! I had so much fun creating this card, figuring out how to make this work, when I got the idea I wasn’t sure that it would, but it did! As you can see on the photos this is a pull tab card, I call it a peekaboo card, as when you pull the tab, 5 little mini elves come peeking out behind the Christmas tree!

A couple of weeks ago, when entering the MFT Superstar completion I designed a peekaboo card where every critter had their own tab, but I wanted to see if I could make all 5 elves be controlled by one tab, to make the peekaboo surprise even more impactful. It was so much fun and you will most likely see more videos/cards like this, giving you a surprise.

Hope you liked my video and hope you come and join the hop, you find my video HERE. Other ways to get to the video on youtube is to hover over the video below and then click on the YouTube text and it should take you to the same video over on Youtube (btw you can do that on all embedded youtube videos, not only mine).

Copic:
E00, E11, R30
YR21, Y26, Y28
E44, E47
R35, R37
G24, G43, G46
T0, T2, 0

Supplies:

When possible affiliate links are used, this means that I receive a small commission when products are purchased through the links (at no extra cost to you) I use the money to support my blog and youtube channel. If you like my projects and tutorial please consider supporting me by clicking through these links when you shop. Thanks!

Videos

Pattern Paper Diagonal Cut Technique | Cute Lil Angel | Christmas In August

Hi Everyone, here with a new card and video tutorial. Todays video is all about a pattern paper diagonal cut background technique that produces two backgrounds in one go, and I’ll show you two different ways of making these into cards.

For the first card I’m using Cute Lil Angel and coloring her with my copic markers in some different yet very christmasy way. I combine her together with a stamped sentiment from Simon Says Stamp, and then put the background on a white Neenah cardbase.

For the second card I’m using the Merry Word Chipboard and the Christmas Word Chipboard as my sentiment and focal image. I really love the layering with these chipboard pieces making it stand out from even the busiest backgrounds.

Hope you enjoy the cards! Have you started creating your Christmas Cards to get a head start before December is rolling in?

Copic:
YR21, YR15, YR18, E08, E18
E50, E00, E21, E11, E04
Y21, Y26, Y28, Y02
N0, N2, N4, 0
YG05, YG09, G09, G28

Supplies:

When possible affiliate links are used, this means that I receive a small commission when products are purchased through the links (at no extra cost to you) I use the money to support my blog and youtube channel. If you like my projects and tutorial please consider supporting me by clicking through these links when you shop. Thanks!


Videos

Furry Up – Christmas is near!

Hi Everyone!

As you might have started to see my posting is a little more regular, feeling a lot better and a lot more inspired! And there for I have stepped up my DT game and join back in with the wonderful Christine and her company Create A Smile Stamp! You will be seeing at least one video a month where I feature her stamps.

Todays card is all about that furry beast and the video is showcasing how to make a masked blended galaxy background with distress oxide inks. Hope you like my card and enjoy the video!

Copic:
BG10, BG32, BG15, BG49
B60, B63
YG01, YG05, YG09, G19

Supplies:

When possible affiliate links are used, this means that I receive a small commission when products are purchased through the links (at no extra cost to you) I use the money to support my blog and youtube channel. If you like my projects and tutorial please consider supporting me by clicking through these links when you shop. Thanks!

https://linkdeli.com/widget.js?1549439153802