Hi Everyone! Interactive cards are so fun, specially those who surprise you. And this card most definitely will. It’s a secret pull slider card, you pull your tab and out in the other direction another panel will slide out. I had so much fun creating this and making sure that both the front panel, pull tab panel and secret panel is well decorated.

I started by stamping up several 4×5” sheets of marker cardstock with multiples of the leafs, acorns and pumpkins from the Fall Friends Stampset, I also stamped the focal images and a couple of squirrels . I then coloured them with my Copic Markers and cut them out with my scissors, it would have gone so much faster if I had used the coordinated dies, but I had opted to buy some more stamps instead.

The next step was to create the card and the slider construction. I cut out two panels that was about 3 1/4” wide with some stitched rectangle dies for the pull tab and secret panel. I also used one of the bigger rectangles from the same set to cut out pattern paper and cardstock for the front panel. For the slider mechanism I cut a piece of 4 x 5 1/4” cardstock and cut out two 1/2 x 3 1/4” rectangles from the top and bottom of that piece, leaving me with something that looks like a capital H with a very thick middle.

For the slider part of the mechanism I used a 3 3/16” strip of plastic (mine is from a doggy bag), which I wrapped around once, taped down and then cut of the excess. To make it slide better I used a tea light candle and rubbed the cardstock before adding the plastic bag strip. While putting the card together I recommend keeping track of where you taped the bag together as that part can’t slide over the edge, so you want the pull tab to be taped on top of it and then you don’t have to worry.
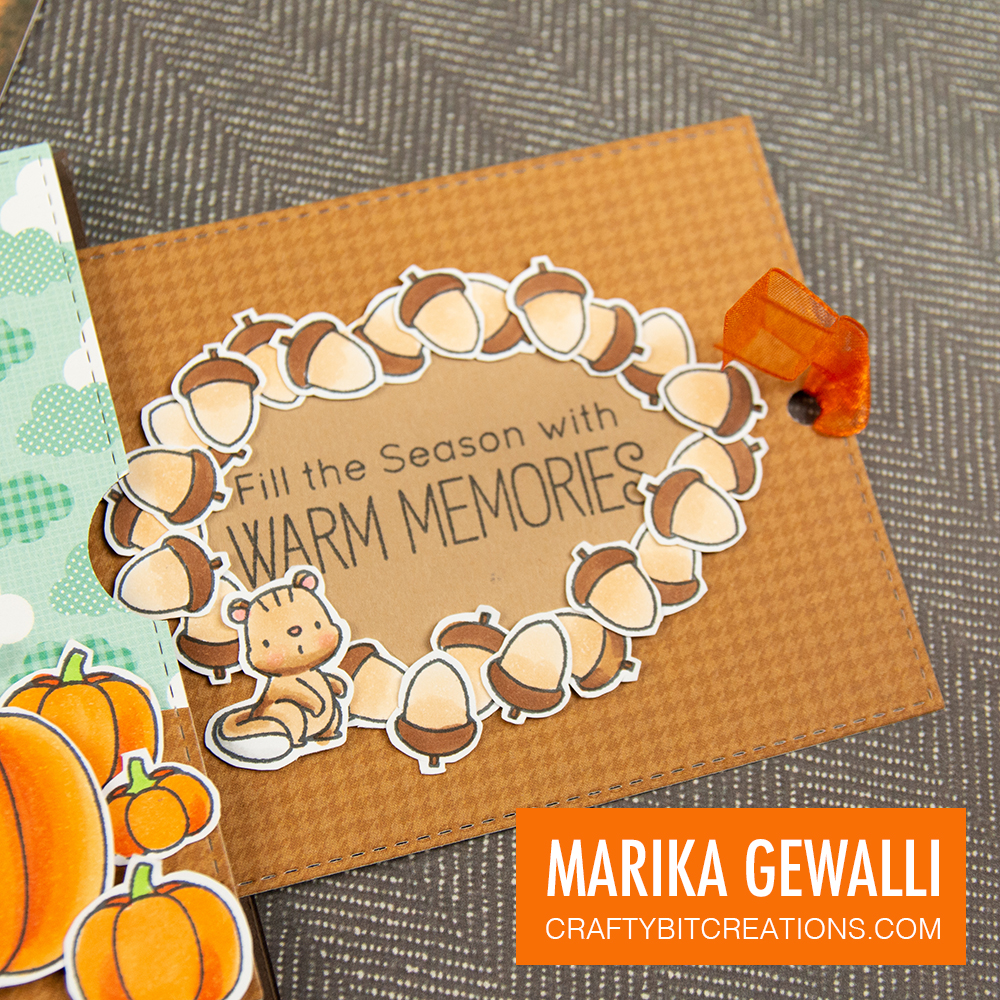
I use foam tape on the side tabs, but If you don’t decorate the panels with as many images as me you could getaway with just using strong double sided tape. After decorating the panels, you want to put double sided tape on the secret panel on the right side, on the underside. And on the left, on top on the pull panel. If you want to make it easier to pull, you can add some ribbon on the right side on the pull panel, then it’s easier to grip and pull.
Line up the secret panel on to the mechanism and the left side, and line up the pull panel underneath and the right side. Then you can remove the paper of the foam tape and line it up with the front panel and then the back panel, I used an A2 card base so that I could write a more private message inside.
Hope you enjoy the card and the video tutorial. See you on Friday when it’s my turn to join in with the Save the Youtuber Blog Hop.
Copic:
E000, E00, E21, E11, E04, R30, R32
E51, E53, E55, E57, E59
YG01, YG03, YG05
G03, G16, G17
YR21, YR15, YR18
T0, T2, 0, B63
Supplies:
When possible affiliate links are used, this means that I receive a small commission when products are purchased through the links (at no extra cost to you) I use the money to support my blog and youtube channel. If you like my projects and tutorial please consider supporting me by clicking through these links when you shop. Thanks!